How To Change The Mouse Pointer Size And Color On Windows 10
Are you tired of seeing a dull white or black mouse pointer? Want a big cursor that’s easier to see? If your answer is Yes then you have come to the right place because in this article we will see How to change the mouse pointer size and color in Windows 10.
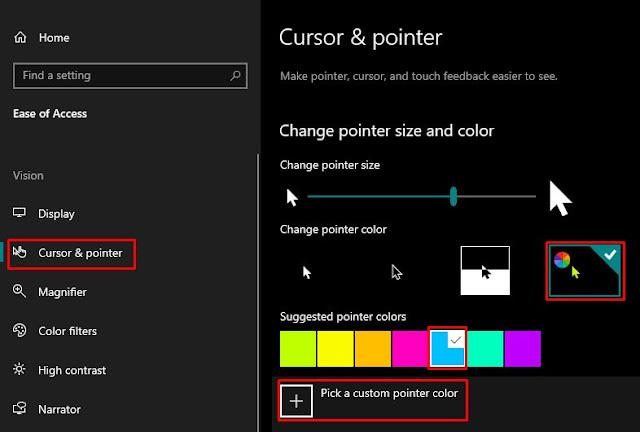
Step-2: From the Settings menu click Ease of Access and then Choose Cursor & pointer from the options on the left.
Step-3: From the Change pointer size and color section, use the slider displayed beneath Change pointer size, and you can see your pointer changing its dimension in real-time.
By default, Windows 10 uses the smallest pointer size, but you can choose any dimension from 1 to 15, and you can build your pointer bigger than the default.
Step-2: Now you can choose any color you like. From the "Suggested Pointer Colors" panel, Or select “Pick a Custom Pointer Color,” and then choose the one you'd like.
That's it.
Steps to Change The Mouse Pointer Size:
Step-1: Open the Settings on your Windows 10 PC. A quick way to do that press the Windows + I keys on your keyboard.Step-2: From the Settings menu click Ease of Access and then Choose Cursor & pointer from the options on the left.
Step-3: From the Change pointer size and color section, use the slider displayed beneath Change pointer size, and you can see your pointer changing its dimension in real-time.
By default, Windows 10 uses the smallest pointer size, but you can choose any dimension from 1 to 15, and you can build your pointer bigger than the default.
Steps to Change The Mouse Pointer Color:
Step-1: On the right side of the Settings window for Cursor & pointer, look for the Change pointer color section, and choose one of the four available options to modify the color of your pointer.Step-2: Now you can choose any color you like. From the "Suggested Pointer Colors" panel, Or select “Pick a Custom Pointer Color,” and then choose the one you'd like.
That's it.


No comments
Please do not enter any spam link in the comment box.